MCP Setup
Connect MemoryGate to your AI client using the Model Context Protocol (MCP).
Overview
MemoryGate works as an MCP server that your AI client connects to. Once connected, your agent can store and retrieve memories using standardized MCP tools.
Connection Requirements:
- MemoryGate MCP Server URL:
https://api.memorygate.ai/mcp - A MemoryGate account (sign up at dashboard.memorygate.ai)
- Network access to api.memorygate.ai
Quick Reference
| Client | Config Method | Auth |
|---|---|---|
| Claude Web/Desktop | Settings UI | OAuth (browser) |
| Claude CLI | JSON config | API Key |
| ChatGPT (Dev Mode) | Settings UI | OAuth (browser) |
| Codex CLI | JSON config | API Key |
Claude Web / Desktop
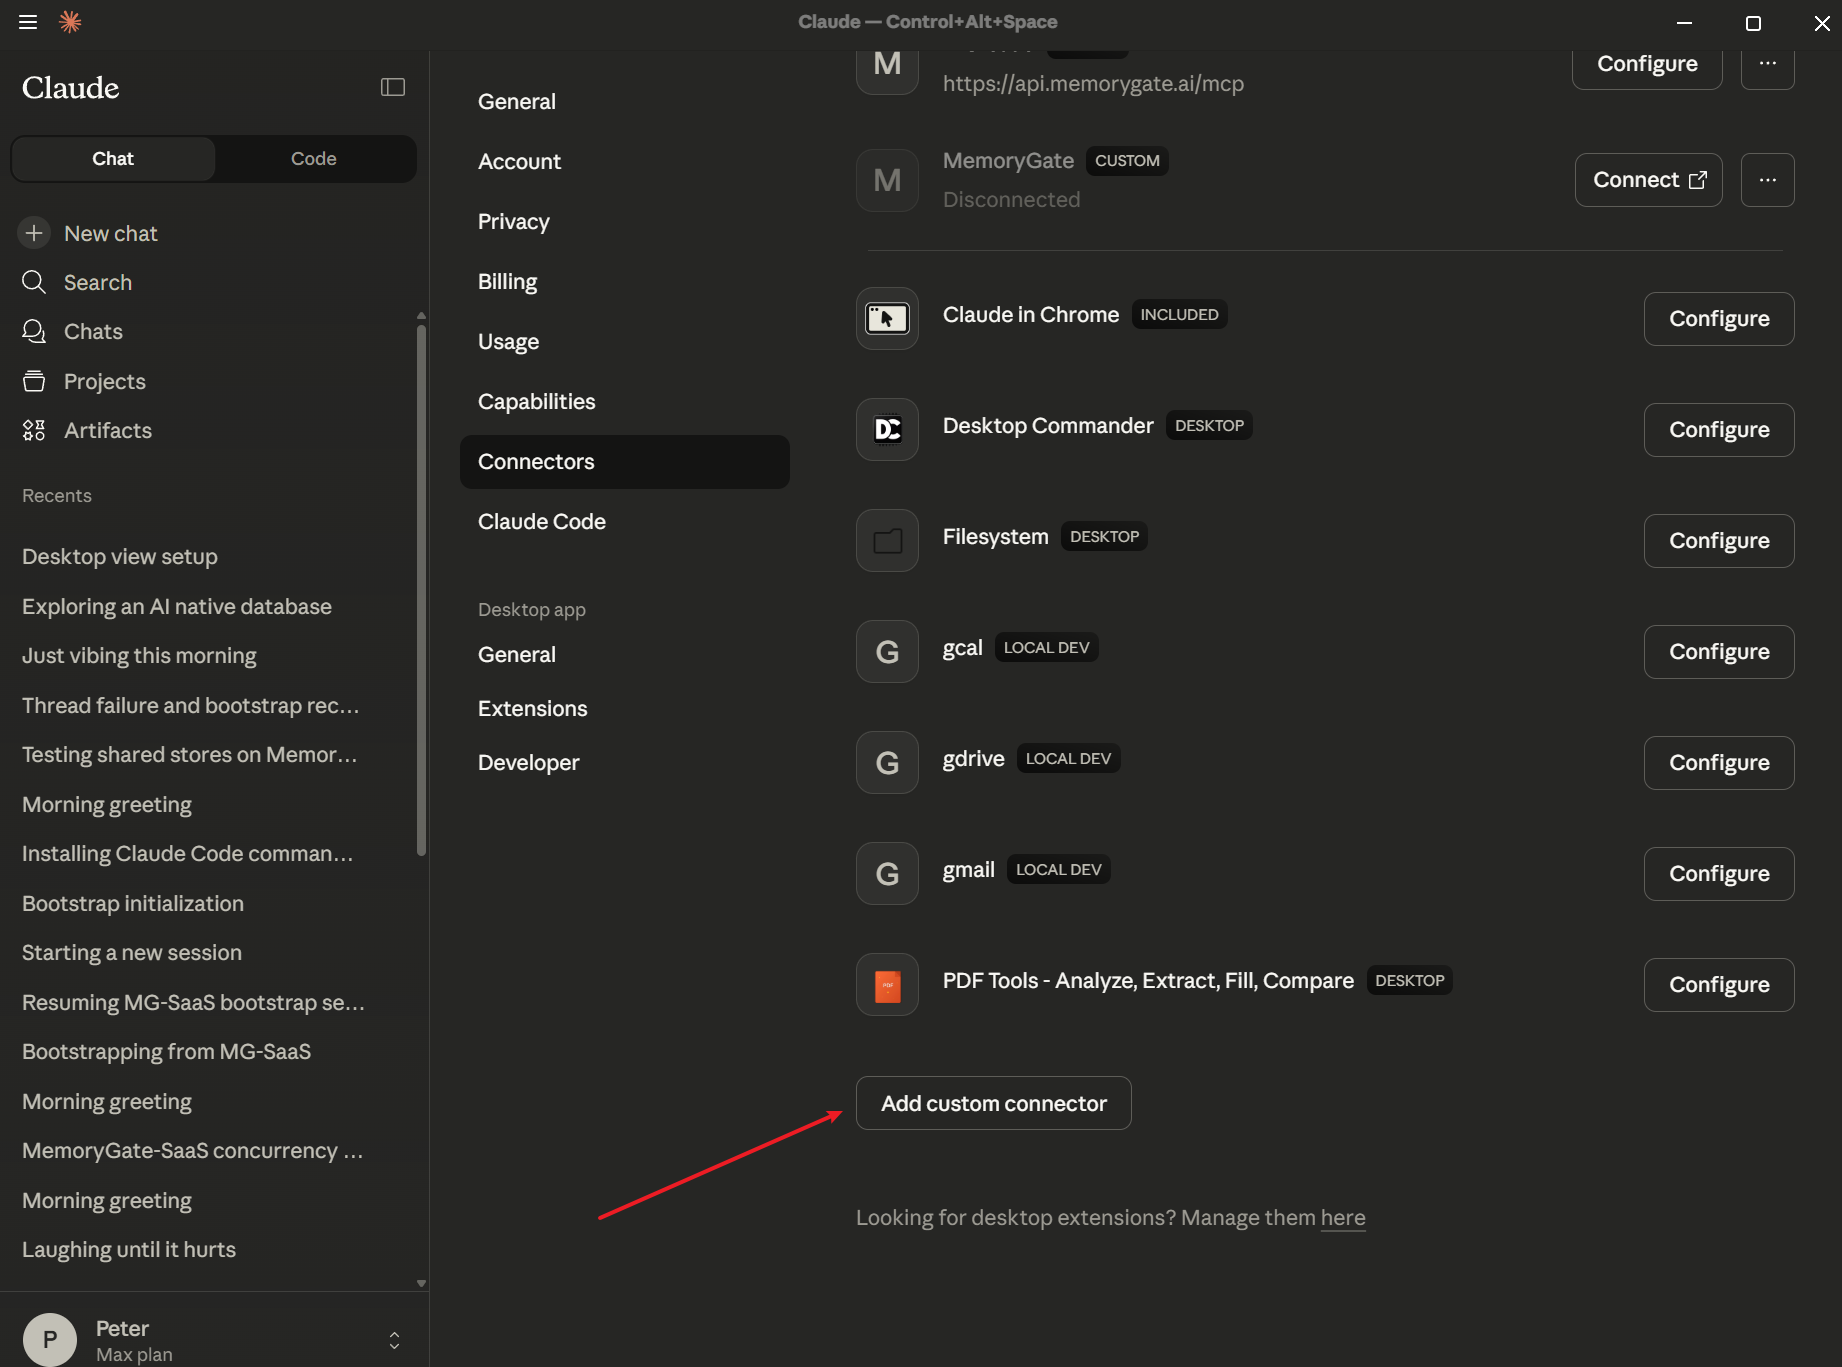
Step 1: Open Connectors Settings
Open Claude Desktop (or claude.ai) and go to Settings → Connectors.
Scroll down and click Add custom connector.
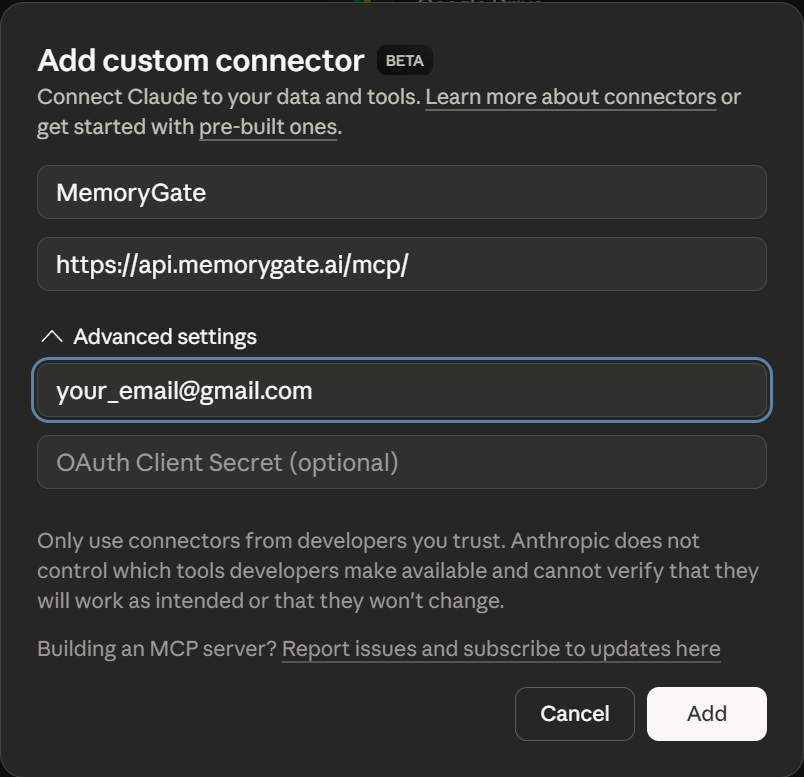
Step 2: Configure the Connector
In the "Add custom connector" dialog, enter:
- Name:
MemoryGate - URL:
https://api.memorygate.ai/mcp/
Expand Advanced settings and enter your MemoryGate account email address.
Click Add to save.
Step 3: Authorize Access
A browser window will open asking you to authorize Claude Desktop to access MemoryGate.
Verify the email and click Authorize Access.

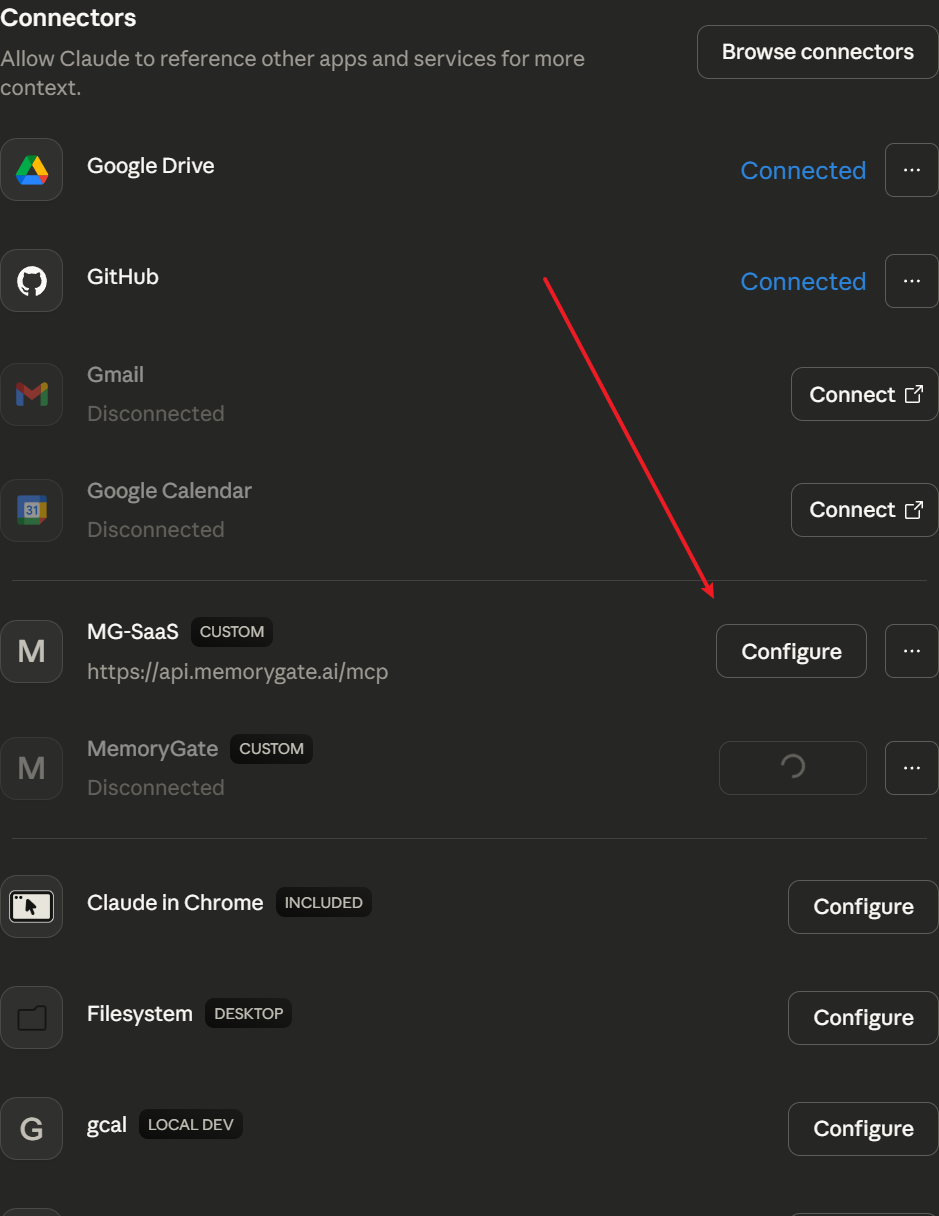
Step 4: Configure Permissions
Return to Claude. Your connector will appear in the list with a CUSTOM badge.
Click Configure to open the permissions panel.
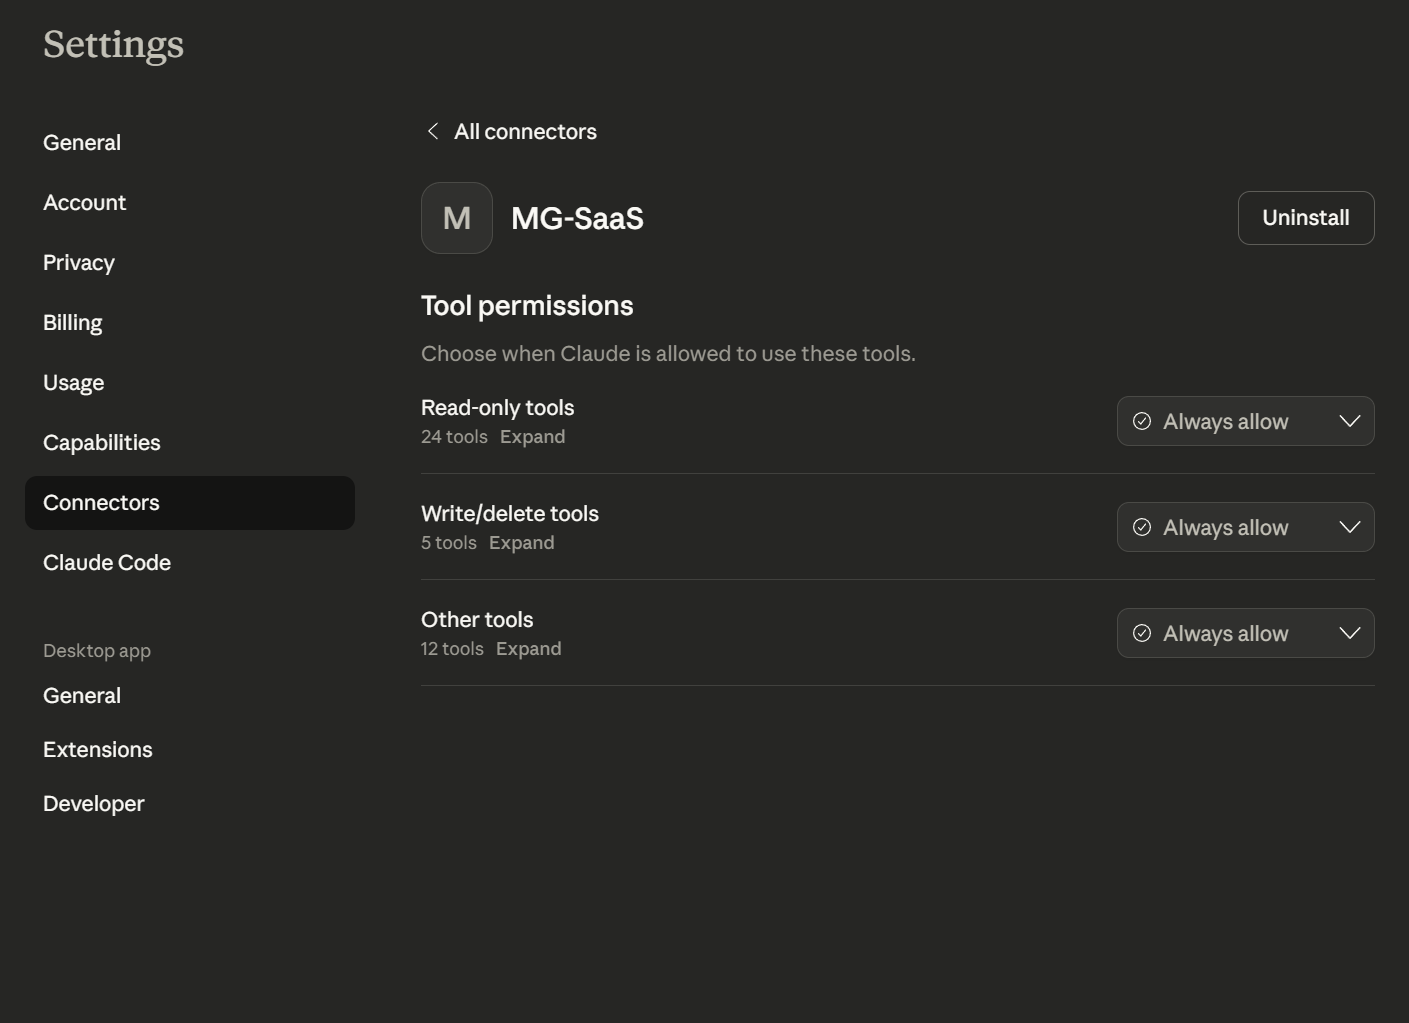
Step 5: Set Tool Permissions
Configure when Claude can use MemoryGate tools:
- Read-only tools (24 tools) - searching and retrieving memories
- Write/delete tools (5 tools) - storing and managing memories
- Other tools (12 tools) - bootstrap, chains, relationships
For seamless operation, set all categories to Always allow.
Claude CLI (Claude Code)
Step 1: Generate an API Key
Go to dashboard.memorygate.ai and sign in.
Navigate to API Keys and click Generate New Key.
Copy the key immediately - it won't be shown again.
Step 2: Configure Claude CLI
Edit your Claude CLI settings file:
- Windows:
%USERPROFILE%\.claude\settings.json - macOS/Linux:
~/.claude/settings.json
Add MemoryGate to the mcpServers section:
{
  "mcpServers": {
    "memorygate": {
      "type": "url",
      "url": "https://api.memorygate.ai/mcp",
      "headers": {
        "Authorization": "Bearer YOUR_API_KEY_HERE"
      }
    }
  }
}
Replace YOUR_API_KEY_HERE with your actual API key.
Using environment variables (recommended):
{
  "mcpServers": {
    "memorygate": {
      "type": "url",
      "url": "https://api.memorygate.ai/mcp",
      "headers": {
        "Authorization": "Bearer ${MEMORYGATE_API_KEY}"
      }
    }
  }
}
Then set MEMORYGATE_API_KEY in your shell profile or environment.
Step 3 (Recommended): Add Bootstrap Instructions
Create or edit CLAUDE.md in your project root (or ~/.claude/CLAUDE.md globally) to auto-bootstrap:
# MemoryGate Bootstrap

When MemoryGate MCP is available, call `memory_bootstrap` at conversation start with:
- ai_name: "Claude Code"
- ai_platform: "Claude CLI"

This ensures persistent identity and proper memory attribution.
ChatGPT Web (Dev Mode)
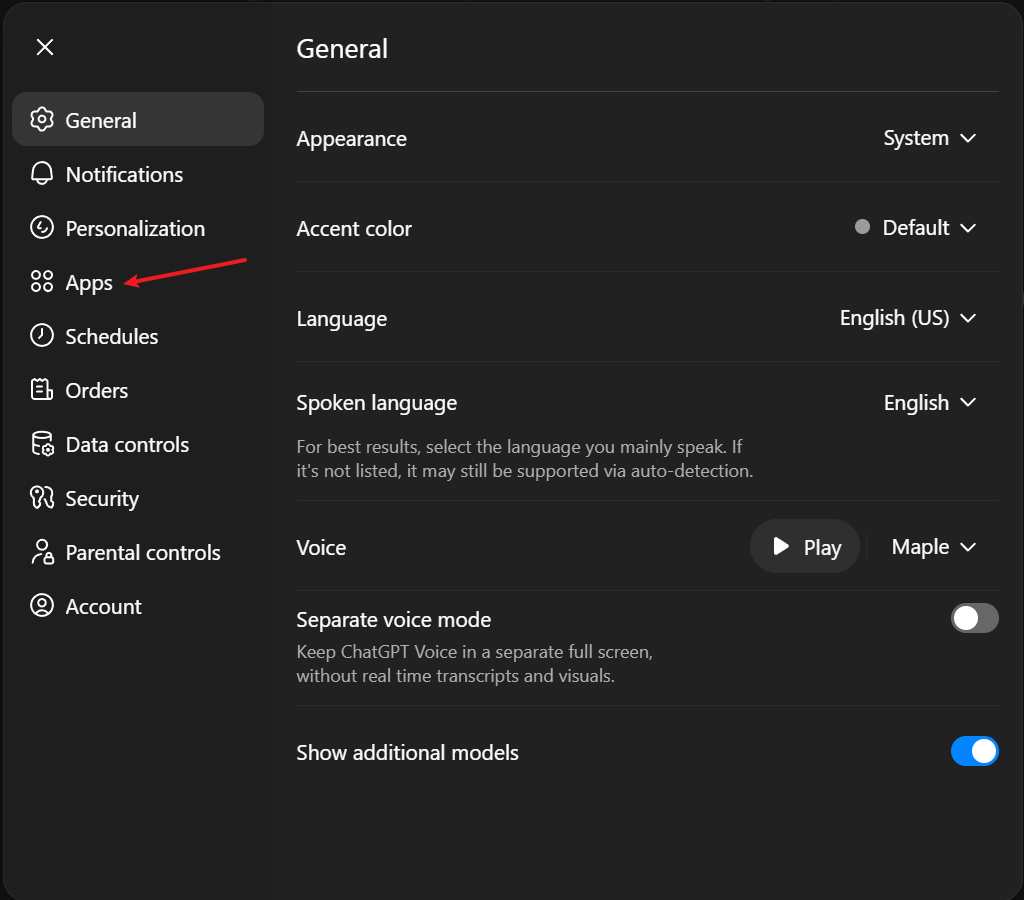
Step 1: Open Apps Settings
Go to chatgpt.com and sign in.
Click your profile icon → Settings, then select Apps from the sidebar.
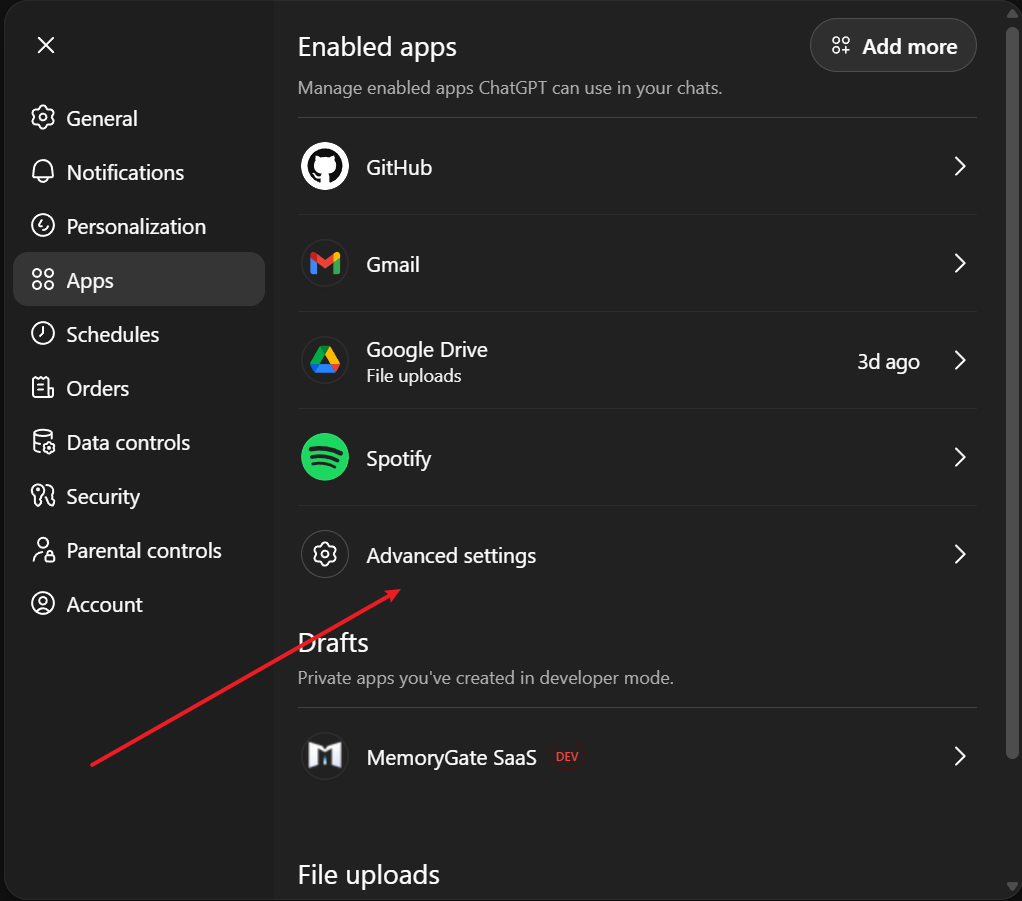
Step 2: Open Advanced Settings
In the Apps panel, scroll down and click Advanced settings.
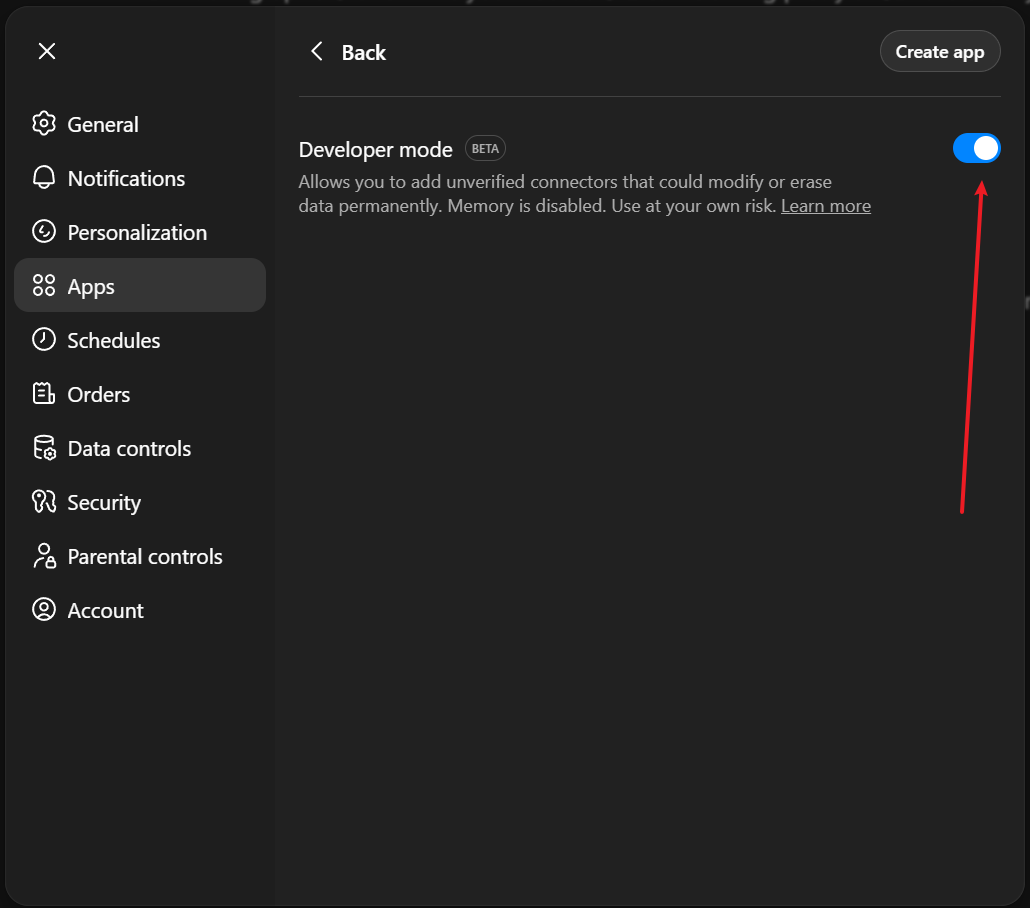
Step 3: Enable Developer Mode
Toggle on Developer mode (marked as BETA).
This allows you to add custom MCP servers like MemoryGate.
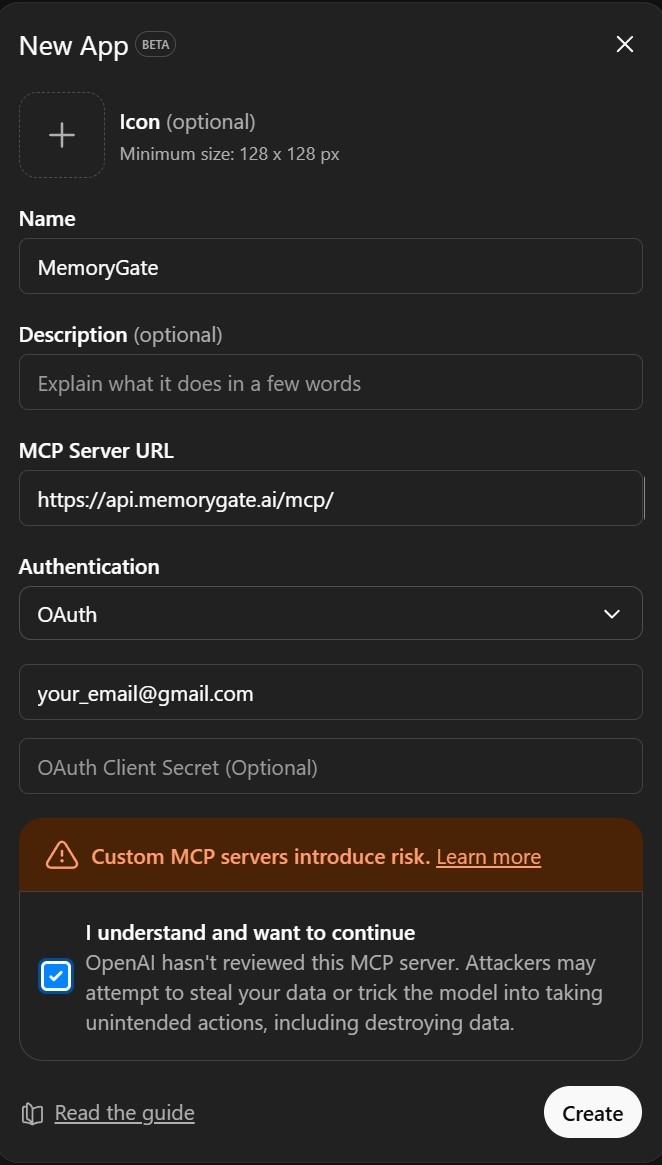
Step 4: Create New App
Click Create app (top right) to open the New App form.
Fill in the following:
- Name:
MemoryGate - MCP Server URL:
https://api.memorygate.ai/mcp/ - Authentication: Select
OAuth - Email: Your MemoryGate account email
Check the box to acknowledge the custom MCP server warning, then click Create.
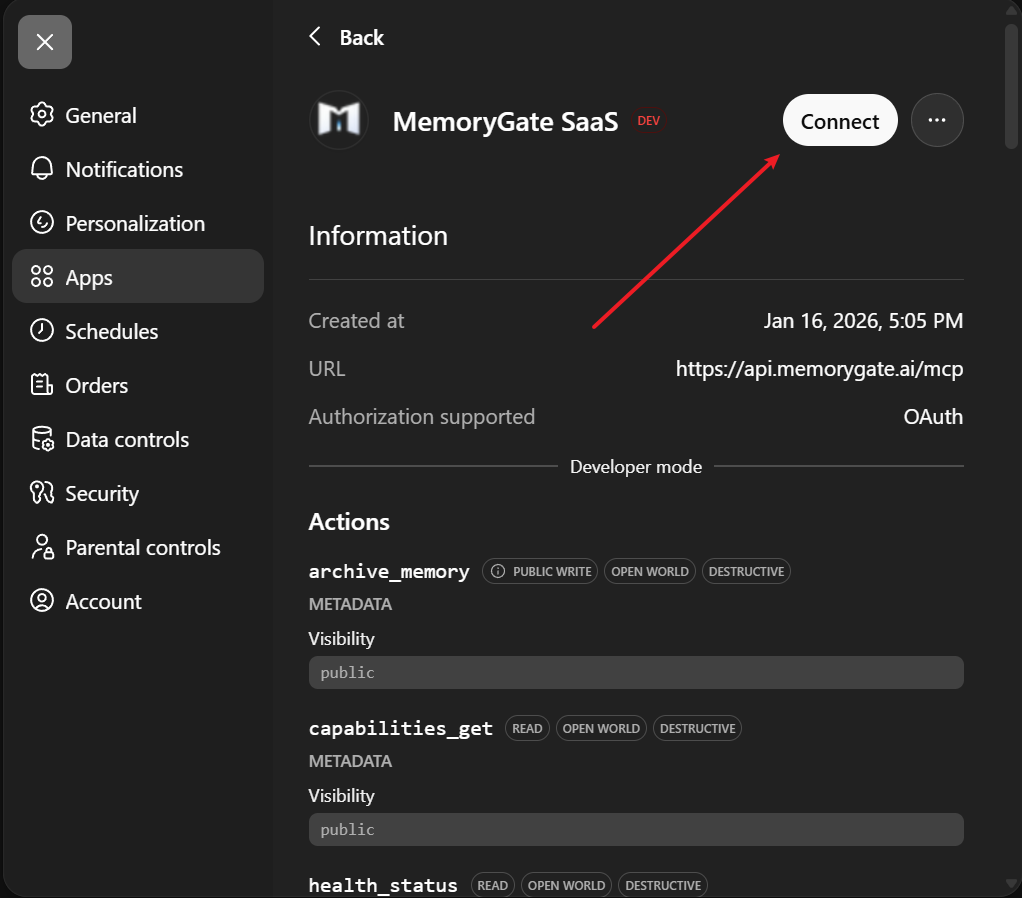
Step 5: Connect the App
After creating the app, you'll see its details page showing the URL and available actions.
Click the Connect button to initiate the OAuth flow.
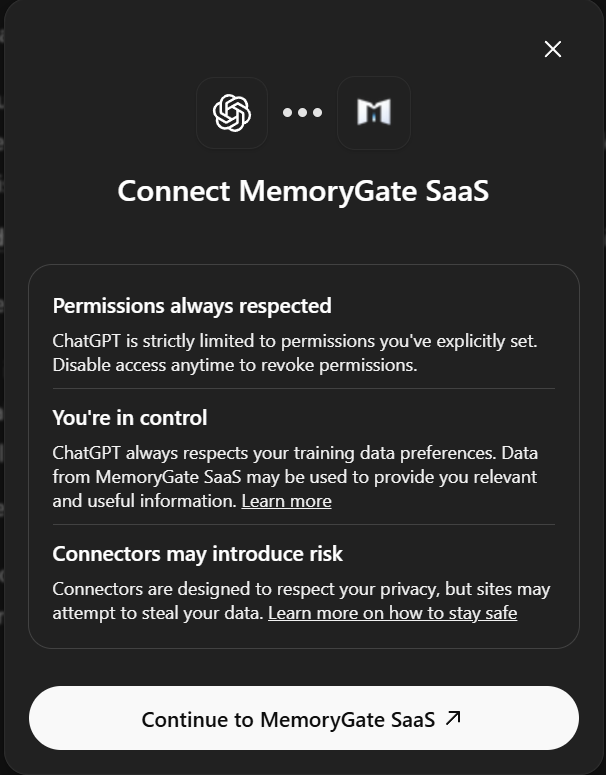
Step 6: Authorize Access
A dialog will appear explaining the connection. Click Continue to MemoryGate SaaS.
Complete the OAuth authorization in the browser popup that opens.
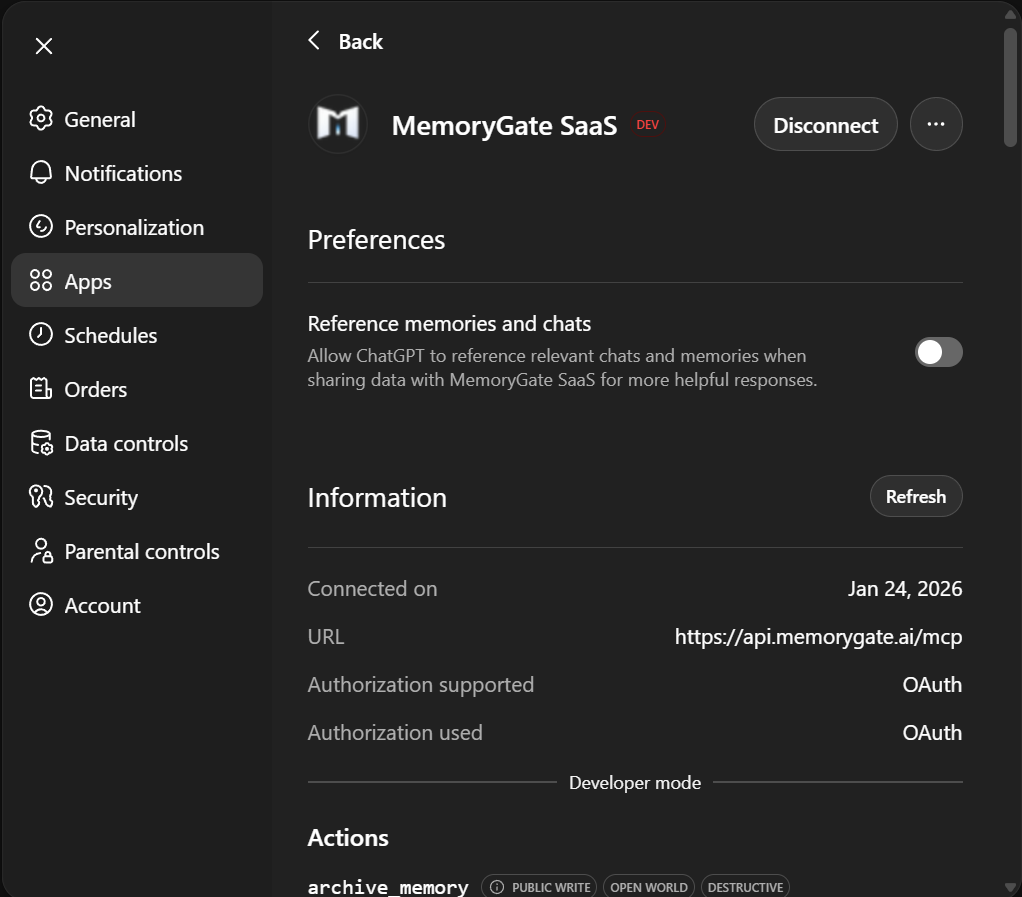
Step 7: Verify Connection
Once connected, you'll see the app status change to Connected with a Disconnect button.
The Information section confirms the OAuth authorization is active.
Start a new chat and verify MemoryGate tools are available.
Codex CLI
Step 1: Generate an API Key
Go to dashboard.memorygate.ai and sign in.
Navigate to API Keys and click Generate New Key.
Copy the key immediately - it won't be shown again.
Step 2: Configure Codex CLI
Edit your Codex configuration file:
- Windows:
%USERPROFILE%\.codex\config.json - macOS/Linux:
~/.codex/config.json
Add MemoryGate to the mcpServers section:
{
  "mcpServers": {
    "memorygate": {
      "type": "url",
      "url": "https://api.memorygate.ai/mcp",
      "headers": {
        "Authorization": "Bearer YOUR_API_KEY_HERE"
      }
    }
  }
}
Replace YOUR_API_KEY_HERE with your actual API key.
Using environment variables (recommended):
{
  "mcpServers": {
    "memorygate": {
      "type": "url",
      "url": "https://api.memorygate.ai/mcp",
      "headers": {
        "Authorization": "Bearer ${MEMORYGATE_API_KEY}"
      }
    }
  }
}AGENTS.md or equivalent config to ensure Codex properly initializes MemoryGate sessions.
Custom MCP Clients
Implementing Your Own Client
If you're building a custom MCP client, you'll need to:
- Implement the MCP protocol (SSE-based transport)
- Handle OAuth 2.0 + PKCE authentication flow
- Connect to the MemoryGate MCP server
- Call MCP tools using the standard format
Server Endpoint: https://api.memorygate.ai/mcp
OAuth Discovery: https://api.memorygate.ai/.well-known/oauth-authorization-server
Transport: Server-Sent Events (SSE) for server-to-client streaming
First-Time Agent Setup
After connecting MemoryGate, your AI agent needs to complete a one-time setup to establish persistent identity. This ensures memories are properly attributed across sessions.
Step 1: Bootstrap Identity
Tell your agent: "Initialize MemoryGate and bootstrap your identity"
The agent should call memory_bootstrap() with:
ai_name: A name for this agent (e.g., "Claude Code", "ChatGPT")ai_platform: The platform (e.g., "Claude CLI", "ChatGPT Web")
The response includes an agent_uuid - a persistent identifier for this agent instance.
Step 2: Save the Agent UUID
The agent_uuid returned from bootstrap must be saved for future sessions.
For CLI tools (Claude Code, Codex): Add bootstrap instructions to your config file:
# In CLAUDE.md or AGENTS.md
When MemoryGate MCP is available, call memory_bootstrap at conversation start:
- agent_uuid: "ag_XXXXXXXXXXXX"  # Your UUID from step 1
- ai_name: "Claude Code"
- ai_platform: "Claude CLI"
For web interfaces: Save the UUID and include it when prompting your agent to initialize MemoryGate at the start of new conversations.
Step 3: Read the User Guide
Tell your agent: "Read the MemoryGate user guide"
The agent should call memory_user_guide() which returns:
- Complete tool documentation
- Memory type schemas (observations, patterns, concepts, documents)
- Relationship vocabulary and conventions
- Best practices for memory operations
This self-documentation helps the agent understand how to use MemoryGate effectively.
Step 4: Create an Anchor Chain
Tell your agent: "Create your anchor chain with your identity and operating conventions"
An anchor chain stores the agent's persistent configuration:
- Constitution: Identity, ref formats, domain taxonomy
- Verb list: Relationship vocabulary (validates, informs, supersedes, etc.)
- Playbook: Operational protocol and behavioral guidelines
The agent calls memory_chain_create() with chain_type: "agent_profile", then appends entries using memory_chain_append().
Finally, call agent_anchor_set() to register the chain as this agent's anchor.
memory_bootstrap() with the saved agent_uuid at the start of each conversation, then load their anchor chain with memory_chain_get() to restore their identity and conventions.
Quick Verification
Test that everything is working:
Storage Test: Tell your agent: "Remember that I'm testing the connection"
Expected: Confirmation that an observation was stored.
Retrieval Test: In a new conversation (after bootstrap), ask: "What do you remember about me testing?"
Expected: The agent recalls the test observation from memory.
Troubleshooting
Connection Fails
Symptoms: Agent says it can't connect to MemoryGate, or MCP tools are unavailable.
Solutions:
- Verify the server URL is exactly:
https://api.memorygate.ai/mcp - Ensure your client has network access to api.memorygate.ai
- Try disconnecting and reconnecting the MCP server
- Check that OAuth authorization completed successfully
- CLI tools: Verify your JSON config syntax is valid (use a JSON validator)
- CLI tools: Check the config file location matches your OS (see setup sections above)
OAuth Authorization Failed
Symptoms: OAuth flow doesn't complete, or you get authentication errors.
Solutions:
- Clear your browser cookies and try again
- Ensure you're signed in to your MemoryGate account
- Try using an incognito/private browser window
- Check that your account is active at dashboard.memorygate.ai
Tools Not Appearing
Symptoms: Agent doesn't have access to MemoryGate tools.
Solutions:
- Restart your AI client after adding the MCP server
- Verify the connection status in your client's MCP settings
- Check that no firewall is blocking api.memorygate.ai
Memories Not Persisting
Symptoms: Agent stores memories but can't retrieve them later.
Solutions:
- Ensure
memory_init_session()is being called at conversation start - Check that observations have sufficient confidence scores (≥ 0.5)
- Verify your account has available storage quota
Security Considerations
OAuth Flow: MemoryGate uses OAuth 2.0 + PKCE for secure authentication. Your identity is established through the OAuth flow, ensuring secure access to your memories.
Data Privacy: Your memories are private to your account. MemoryGate employees cannot access your stored data without explicit authorization.
API Keys: For programmatic access, you can generate API keys in the dashboard. Treat these like passwords—never commit them to version control.
Next Steps
Once connected, learn about:
- Core Concepts - Understanding how memory works
- API Reference - All available tools and endpoints
- Examples - Common usage patterns